During internet browsing, many websites do not allow direct saving of data for personal use. The simplest solution in this case is to manually copy and paste the data, which can quickly become tedious and time-consuming. That's why web scraping techniques are often used to extract data from websites.
Web Scraping is the automation of the quasi-automatic process of extracting data from websites. This operation is performed using scraping tools often known as web scrapers. These tools allow you to load and extract specific data from websites based on users’ needs. They are most often custom-designed for a single site and then configured to work with other websites that have the same structure.
With the Python programming language, the most commonly used tools in the field of Web Scraping are BeautifulSoup and Scrapy Crawler. In this article, we will present some differences between these two tools and focus on Scrapy later on.
Web Scraping vs Web Crawling
Before delving into the subject, it’s quite interesting to understand the difference between Web Scraping and Web Crawling techniques:
- Web Scraping
Web Scraping uses bots to programmatically analyze a web page and extract content from it. With Web Scraping, it’s necessary to target and extract specific data.
Example of web data extraction: Extracting prices of various specific products on Amazon or any other e-commerce website.
- Web Crawling
The term crawling is used as an analogy to how a spider crawls (that’s also why web crawlers are often called spiders). Web Crawling tools also use robots (bots called crawlers) to systematically browse the World Wide Web, typically for the purpose of indexing it.
This involves looking at a page in its entirety and cataloging all elements, including the last letter and period on the page. The bots used will then, during their navigation through heaps of data and information, locate and retrieve information that resides in the deepest layers.
As examples of Web Crawling tools, you can consider all search engines like Google, Yahoo, or Bing. They crawl web pages and use the extracted information to index them.
BeautifulSoup vs Scrapy
Let’s continue with a quick comparison between BeautifulSoup and Scrapy, the two most widely used Web scraping libraries.
- BeautifulSoup
BeautifulSoup is a very popular Python library that can be used to analyse HTML or XML documents in order to describe them using a tree or dictionary structure. This makes it easy to find and extract specific data from web pages. BeautifulSoup is fairly easy to learn and has good, comprehensive documentation that makes it easy to learn.
The advantages of BeautifulSoup :
– Very good documentation (very useful when you’re just starting out).
– Large community of users.
– Easy for beginners to learn and master.
Disadvantages:
– Dependence on other external Python libraries.
- Scrapy
Scrapy is a comprehensive open-source framework and is among the most powerful libraries used for web data extraction. Scrapy natively integrates functions for extracting data from HTML or XML sources using CSS and XPath expressions.
Some advantages of Scrapy:
- Efficient in terms of memory and CPU.
- Built-in functions for data extraction.
- Easily extendable for large-scale projects.
- Relatively high performance and speed compared to other libraries.
As disadvantages, we can mention the limited documentation, which can be discouraging for beginners.
To summarize all the points mentioned above:
| Scrapy | BeautifulSoup |
|---|---|
|
|

Scrapy architecture
When a project is created, various files are used to interact with Scrapy’s main components. Scrapy’s architecture, as described in the official documentation, is shown below:

If we analyse Scrapy’s architecture diagram, we can see that its central element, the engine, controls four executive components:
- Spiders
- Item Pipelines
- The Downloader
- The Scheduler
At the beginning of the process, communication occurs through Spiders, which allow the transmission of requests (containing the URLs to be scraped and the information to be extracted) to the engine.
The engine then forwards the request to the Scheduler to enqueue it (if multiple URLs are provided).
The engine also receives requests from the Scheduler, which has ordered tasks previously, and forwards them to the Downloader module, which downloads the HTML code of the page and transforms it into a Response object. The Response object is then passed to the Spider and subsequently to the ItemPipeline module. This process repeats for different URL links of web pages.
Therefore, we can now better define the roles of the components:
- Spiders: Classes defining different scraping methods by users. The methods are invoked by Scrapy when necessary.
- Scrapy Engine: Controls the data flow and triggers all events.
Scheduler: Communicates with the Engine regarding the order of tasks to be performed. - Downloader: Receives requests from the Engine to download the content of web pages.
- ItemPipeline: Successive transformation steps (for cleaning, data validation, or database insertion) applied to the raw extracted data.
Scrapy Installation
Scrapy is fairly easy to install. Simply run the command below in an Ubuntu terminal. You can easily find the equivalent commands for other operating systems:
# creation of a virtual environment (OPTIONAL)
virtualenv scrapy_env
# environment activation (OPTIONAL)
source scrapy_env/bin/active
# install Scrapy
pip install scrapy
# installation verification test
scrapy
# Run a quick benchmark to see how Scrappy works on your hardware.
scrapy bench
The Scrapy command prompt
During the experimentation phase, when you are searching for the code syntax to extract information from web pages, Scrapy has a dedicated command-line interface for interactive interaction with the Engine: the Scrapy Shell.
The Scrapy Shell is built on Python, so you can import any modules you need.
To access this command-line interface (once Scrapy is installed), simply execute the following command:
# Open the shell scrapy
scrapy shell "URL-de-la-page-internet"
# exemple: scrapy shell "https://www.ville-ideale.fr/abries_5001"
Once launched, it is within the Shell that you can execute commands to actually extract information from the specified web page. You can interactively test different commands and extraction approaches.
After various experiments, the extraction code lines will be grouped into a Spider class for automation.
CSS and XPATH selectors
During the creation of a Spider class, the most important step is to create the code responsible for data extraction (code determined in the previous step from the Scrapy Shell).
To indicate which data from the website should be downloaded by Scrapy, you can use:
XPath Selectors:
XPath selectors are frequently used in web scraping due to their extensive capabilities. For example, you can use them to:
– Specify the exact element to extract from the page.
– Retrieve the text associated with an element.
– Download the parent or child element.
– Fetch adjacent elements.
– Retrieve elements that start/end with keywords.
– Obtain elements whose attributes satisfy a mathematical condition.
CSS Selectors:
CSS selectors provide an easier alternative, especially for beginners who are familiar with CSS commands. CSS selectors have slightly fewer capabilities than XPath, but in the case of Scrapy, they have been extended with additional syntax for retrieving a specific element’s attribute.
BeautifulSoup Library:
Since Scrapy is written in Python, it’s entirely possible to import other libraries for specific tasks if needed. This includes the BeautifulSoup library, which can be used (and imported) when defining data extraction classes (Spiders).
Example of data extraction with Scrapy
To give you a concrete idea of what Scrapy can do, we’re going to extract some data about DataScientest from the https://fr.trustpilot.com/review/datascientest.com website.
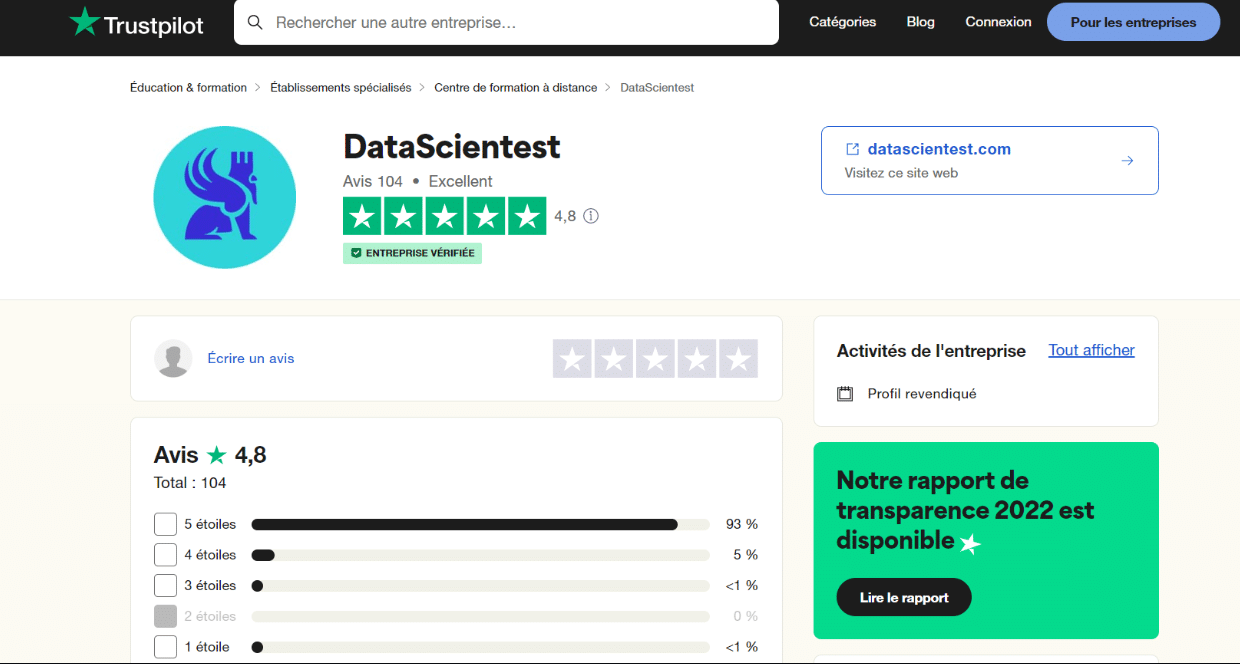
The idea is to gather in a single CSV file all the comments and ratings of learners available on trustpilot. For the sake of simplicity, we will limit ourselves to reviews given in French.
Recommended methodology for Web Scraping with Scrapy :
- Analyse and locate the information to be extracted on the web page
- Prototype in the Scrapy Shell the various commands for extracting each of the elements identified in the previous step
- Create a Scrapy project and create the Spider (to define how to extract information from all the pages)
- Test the Spider on one page
- Apply the spider to all the pages to retrieve all the information.
Step 1: Analysing and locating the information to be extracted
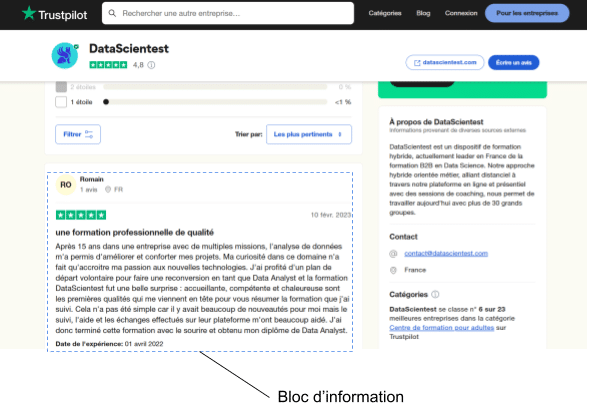
The aim of this fairly manual stage is simply to locate the useful information and identify the associated HTML tags. If we focus on a review (below) :
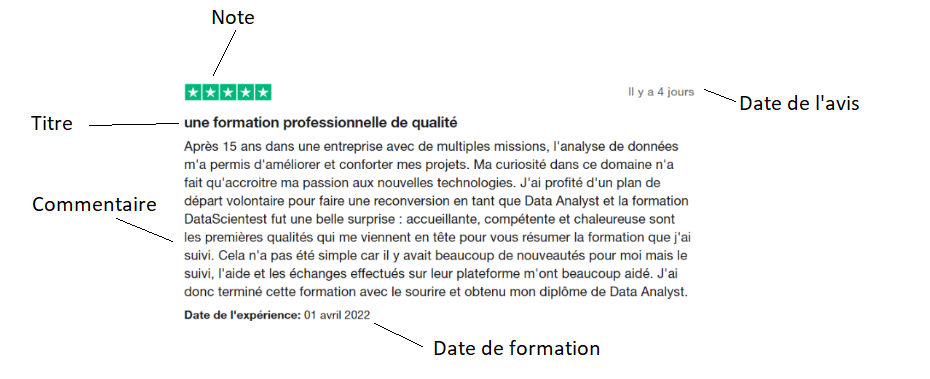
We’ll look at the information below:
- The comment
- The date of the comment
- Training date
- The title of the comment
- The note
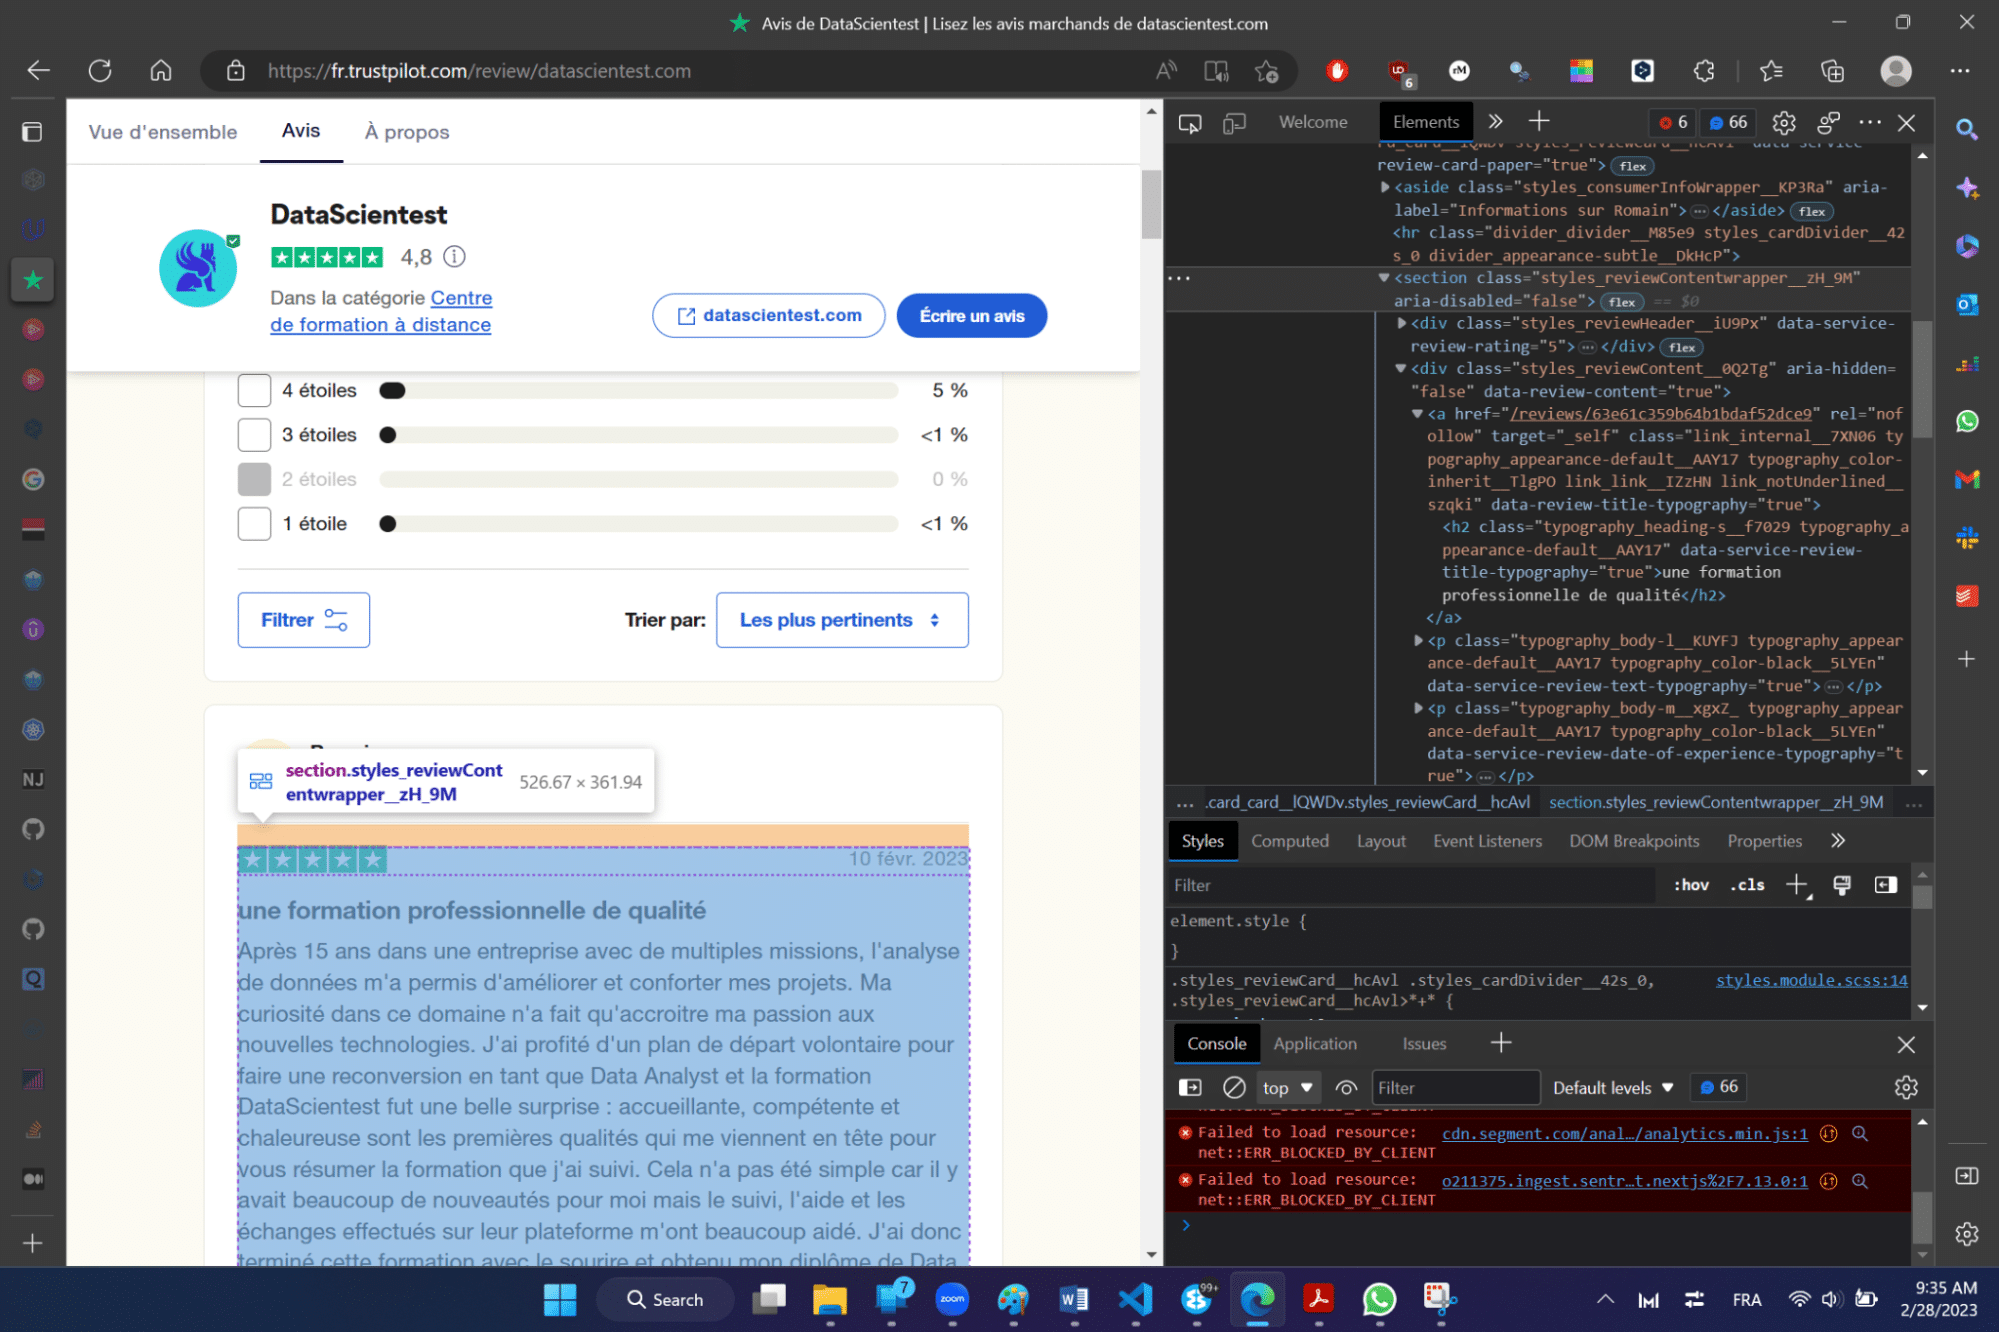
To access the HTML code of the page, simply (in the Edge or Firefox browser) right-click on the page and click on the inspect option. The different tags associated with the different elements of the page will appear on the right.

To access the tag associated with a specific element directly, simply select the element and repeat the previous operation (right-click + inspect).
For example, to obtain the tag associated with the title and after manipulation, we can read the main tag associated with the title of the comment opposite: .typography_heading-s__f7029. This is a CSS tag (also known as a CSS selector) from which only the text can be extracted.
This operation will be repeated for all the elements you wish to extract, so that the corresponding CSS tags are associated with each of them.
Step 2: Experimenting with the Scrapy Shell
Once the tags are clearly identified, you can enter the Scrapy command prompt to define the extraction commands completely.
To enter the Scrapy Shell, you will use the following command (after activating the virtual environment):
# Open the Scrapy shell on the website trustpilot
scrapy shell "https://fr.trustpilot.com/review/datascientest.com"
La commande ci-dessus permet de :
1. Récupérer l’ensemble des éléments de la page spécifiée à l’aide de l’API de Scrapy. Ces éléments seront stockés dans une variable “response”.
2. Ouvrir le Scrapy Shell pour interagir avec la page web et tester des commandes d’extraction.
Using the CSS selectors identified in the previous step, we can use the “response” variable to extract the precise information we are looking for.
To extract the information in a simple and iterative way (and to ensure that the information associated with each comment is simply retrieved), the first element to be extracted is the list of all the information block selectors on a page.
The CSS selector associated with a block is as follows: .styles_reviewContentwrapper__zH_9M’.
You can then run the following command in the Scrapy shell to extract the list of all the blocks.
# Extraction of all blocks
response.css(‘.styles_reviewContentwrapper__zH_9M’)
The output result is as follows:
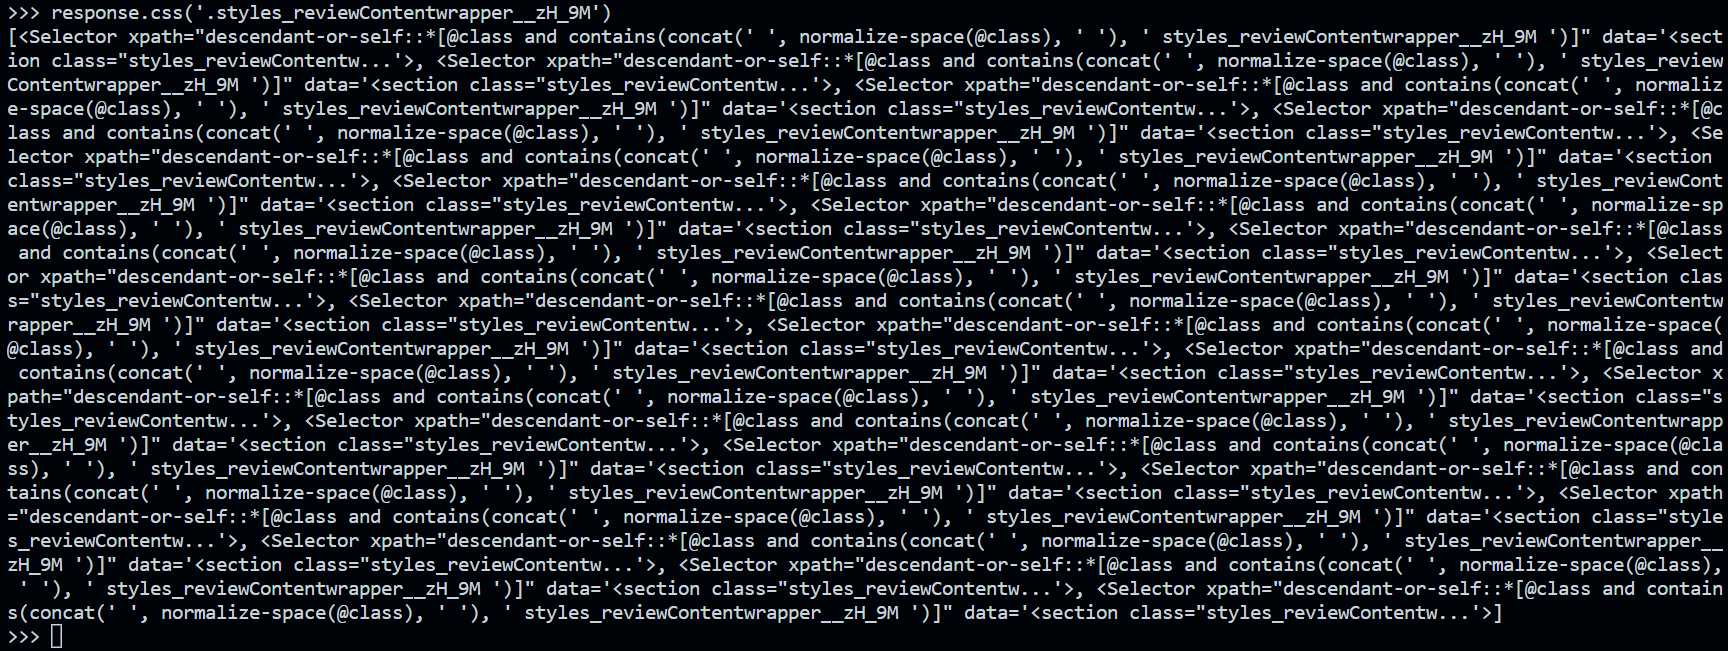
This is a list of selectors enabling the data contained in each block to be retrieved using each of the elements in the list. We can then extract everything we need with the following lines of code (each line must be executed separately in the Scrapy shell):
# recovery of all information groups
selectors = response.css(‘.styles_reviewContentwrapper__zH_9M’)
# extract the note on an element
selectors[0].css(‘img::attr(alt)’).extract()
# extracting the title from an element
selectors[0].css(‘.typography_heading-s__f7029::text’).extract()
# comment and date on an element
elt = selectors[0].css(‘.typography_color-black__5LYEn::text’).extract()
exp_date = elt[-1]
comment = ”.join([word for word in elt[:-1]])
# extract the date of the comment (one day later than what is displayed)
selectors[0].css(‘div.typography_body-m__xgxZ_.typography_appearance-subtle__8_H2l.styles_datesWrapper__RCEKH > time::text’).extract()
Step 3: Creating a Scrapy project
Once the prototyping of the Scrapy code lines is completed, you can easily create a Spider class that will be the consolidation of all the code lines above within a single Python file.
Scrapy provides native functions for initializing a Scrapy project (and thus initializing the Spider class files). To create a Scrapy project, simply run the following command in the Shell:
# Creating a project (example: trustdst project)
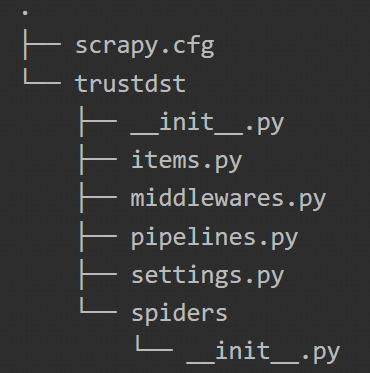
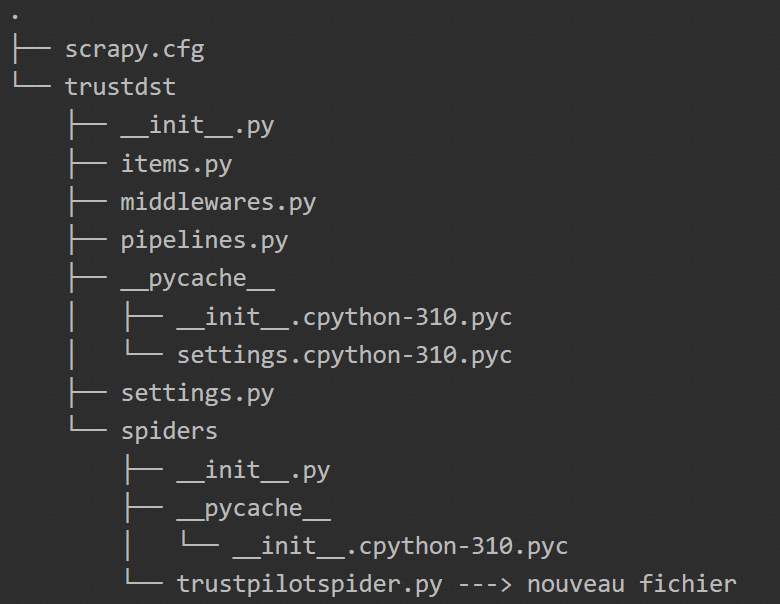
scrapy startproject trustdst
When you have finished, you will see :

The command we have just run has created a folder with initialised Python files. The architecture can be seen below:
The output result is as follows:
Step 4 : Creating the Spider
We’re going to use the architecture created in the previous step to create the Python class file that will extract all the information from a page at once. Here again, Scrapy will allow us to initialise the file in question with the command below:
# creation of the Spider class for scraping
scrapy genspider trustpilotspider en.trustpilot.com/review/datascientest.com
This command will create the trustpilotspider.py file that we will modify and use for data scraping.
You can then modify the file as follows:
# Import scrapy
import scrapy
# definition of the sipder
TrustpilotspiderSpider(scrapy.Spider) class :
“””
name : a class attribute which gives a name to the spider.
We’ll use it when we run our scrapy crawl spider later.
<spider_name>.
allowed_domains: a class attribute that tells Scrapy that it
should only ever fetch pages from the chocolate.co.uk domain.
This prevents the spider from fetching pages in the chocolate domain.
star_urls : a class attribute which tells Scrapy the first url
that it should explore. We’ll modify it in a moment.
parse: the parse function is called after a response has been
received from the target website.
“””
name = “trustpilotspider
allowed_domains = [“en.trustpilot.com”]
start_urls = [“https://fr.trustpilot.com/review/datascientest.com”] # Shift URL
def parse(self, response) :
“””
Module for extracting information
“””
# Loop over all the information blocks
selectors = response.css(‘.styles_reviewContentwrapper__zH_9M’)
# Iterative extraction of information
for selector in selectors :
# Information to be returned
yield{
‘notes’: selector.css(‘img::attr(alt)’).extract(),
‘title’: selector.css(‘.typography_heading-s__f7029::text’).get(), # .extract()[0]
exp_date’ : selector.css(‘.typography_color-black__5LYEn::text’).extract()[-1],
‘comments’ : ”.join([text for text in selector.css(‘.typography_color-black__5LYEn::text’).extract()[:-1]),
comment_date’ : selector.css(‘div.typography_body-m__xgxZ_.typography_appearance-subtle__8_H2l.styles_datesWrapper__RCEKH > time::text’).get()
}
To run the file, simply execute the command below:
scrapy crawl trustpilotspider ou scrapy crawl trustpilotspider -O myonepagescrapeddata.json
(if you want to save the result in a JSON file)
Conclusion
Data is one of the most valuable assets that a company can possess. It is at the heart of Data Science and Data Analysis. Companies actively collecting data can gain a competitive advantage over those that do not. With enough data, organizations can better determine the root causes of problems and make informed decisions.
There are scenarios where an organization may not have enough data to draw the necessary insights. This is often the case for startups that typically begin with little to no data. One solution in such cases is to employ a data acquisition technique like Web Scraping.
Scrapy is an open-source framework that efficiently extracts data from the web and has a large community of users. It is well-suited for large-scale Web Scraping projects as it provides a clear structure and tools for processing the retrieved information.
This article was intended to introduce Scrapy with some of its basic features used by Data Engineers, Data Scientists, or Data Analysts for information extraction.


