Python Nose is a Python-based test automation framework based on the standard unittest library. Find out more about its advantages and features, the differences between versions 1 and 2, and how to take a training course to master it!
Python’s unittest module is used for unit testing of source code, particularly in the fields of Data Science and Machine Learning. However, this default framework requires a lot of code and imposes the inclusion of tests in large classes.
As an alternative, there are several test automation frameworks such as PyUnit, Pytest, Robot and Cucumber. These tools simplify the work of developers on test code.
The Python Nose automation framework is an extension to unittest that simplifies testing. Read on to find out everything you need to know!
What is the Python Nose framework?
Python Nose is a Python automation framework created in 2005 by Jason Pellerin. Its aim was to offer the same testing idioms as py.test, in a package that was easier to install and use.
Although it is based on unittest, its rich ecosystem of plugins simplifies testing. Its various plugins help with test execution, parallel or multi-process testing, log management and reporting. It can also be used to run doctests, unit tests or tests without boilerplate code.
In addition, plugins add support for decorators, parametric tests, classes and modules. Another advantage is test case discovery and automatic collection.

What is Nose2?
Nose2 is the successor to Nose, based on the unittest2 plugin branch. It offers a better plugin API and simplifies internal processes and interfaces.
Numerous plugins are incorporated directly into the Nose2 module and loaded by default. In particular, they help with test parameterisation, organising test fixtures into layers, capturing log messages and reporting.
Parallel test execution is still not supported, but loading plugins is very easy. Simply add module names to the list of plugins in the [unittest] section of the configuration file. It is also possible to pass the plugin module using the -plugin argument on the command line.
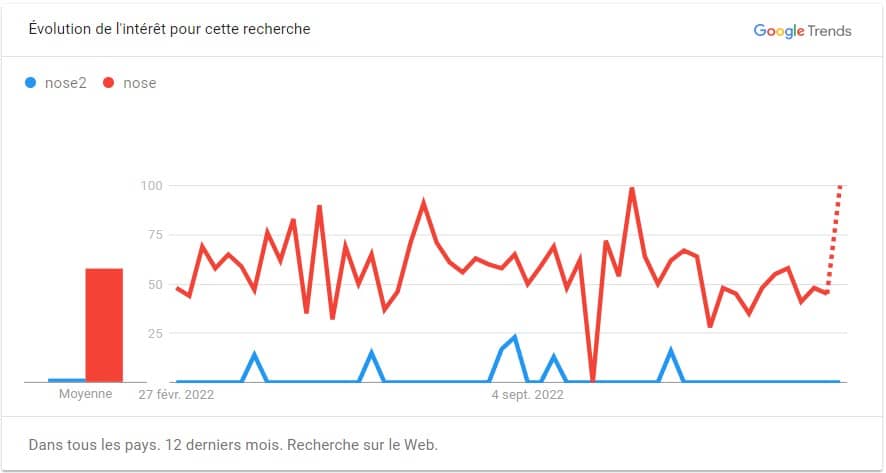
Despite the launch of Nose2 as the official successor, many developers continue to opt for version 1.3.7. Both iterations of the framework are therefore used.
How test discovery works with Nose
Test discovery with Nose is governed by several rules. Like all Python automation frameworks, Nose automatically executes all tests in the parent folder and its subfolders.
Modules or files selected by the framework must begin with “‘test_'”, just like methods. Similarly, test classes containing methods should begin with “‘Test'”.
These are just some of the naming conventions used for testing with Nose. The full set of rules can be found on the official Nose website.
With Nose2, a plugin implements automatic test discovery. This plugin searches for test modules or files in packages and directories whose names start with “test” and activates the loadTestsFromModule() hook for all discoveries. This allows other plugins to load the tests.
Definition and operation of fixtures
The Nose framework allows fixtures for setup and teardown methods at test, package, class or module level. This eliminates unnecessary initialisation, which can reduce performance if tests are run frequently.
As with the py.test or unittest fixtures, the setup method is always executed before a test or collection of tests. The teardown method is launched if the setup method has been executed successfully.
The status of the current test is not taken into account. In this way, Nose extends the unittest fixture model for setup and teardown.
Fixtures can be performed at several levels. Firstly, for packages containing several tests, the setup and teardown methods are launched once per test run.
This avoids the need to create setup and teardown methods launched once for each module or test case.
It is also possible to define setup and teardown methods at module level. The respective methods will then be executed at the start and end of the module.
Fixtures can also define setup and teardown at function level. As their names suggest, setup_function and teardown_function are executed before and after a test function call.
There is no specific naming convention, but it is mandatory to apply the setup method with the @with_setup decorator imported from Nose.
Finally, a test class is a class defined in a test module corresponding to test_Match or being a subclass of unittest.TestCase.
The respective setup and teardown functions are executed at the beginning and end of the test method class. The setup method must be applied using the @classmethod decorator.

Parametric testing
Version 1.3.7 of the Python Nose framework does not offer direct support for parameterised testing. It is necessary to use the “parameterized” package, formerly called “nose-parameterized”.
This package is compatible with all other Python test automation frameworks. It is installed by typing the command ‘pip install parameterized’ in the terminal.
For its part, Nose2 does not require a separate package to be installed for test parameterisation. More types of parameterised tests are supported. Test generators are also supported by unittest’s test classes, test functions and TestCase subclasses.
Parallel testing
Like other popular test frameworks, Nose supports parallel testing. The nose.plugins.multiprocess plugin can be used to parallelize the test run over a configurable number of processes.
This approach speeds up CPU-bound test runs, but is also very beneficial for IO-bound tests where most of the time is spent waiting for data to arrive. The official Nose website contains in-depth information on parallel testing.
The mp plugin introduced in version 0.3 of Nose2 enables tests to be distributed across multiple processes. However, it is important to check that its use does not create a conflict.
Nose vs Nose2: what are the differences?
Nose and Nose2 have several major differences. Firstly, Nose2 is available for current Python versions, whereas the first Nose is only supported up to version 2.4.
Like unittest2, Nose2 only supports fixtures at module or class level. Fixtures at package level are no longer supported.
In addition, Nose2 does not need a custom importer, since test modules are imported using __import__(). Support for parameterised tests and generators has also been extended to unittest’s TestCase classes, functions and subclasses.
Whereas Nose uses setuptools entry points to load plugins, Nose2 does not load any plugins on the test system and requires plugins to be listed in configuration files.
Finally, all configurations must be made via configuration files on Nose2. This is not the case with the first version, as the configuration parameters must be available as command line options.
It is therefore preferable to use Nose2 for repeated test runs, since the configuration is stored in more readable .cfg configuration files.
How do I use Nose for Python?
To install the Nose framework, simply run the “pip install nose” command in the terminal. The Nose package can be imported using “import nose” in the code, but this step is optional.
If you are using specific modules, you need to import them using “import Nose.<module_name>” in the code.
As the Nose module is installed for both the existing Python distribution and nosetests.exe, it is possible to run the tests with the commands “nosetests <file_name.py>” or “python -m nose <file_name.py>”.
To install Nose2, type the command “pip install nose2”. The Nose2 package can be imported using “import nose2” in the implementation, and a specific module from the package can be imported using “from nose2.
<package_name> import <module_name>”.The command to run a test with Nose2 is “nose2 –verbose <filename_without_.py>”.
Conclusion: Nose simplifies test automation
By now you’re familiar with the Python Nose framework for testing. This unittest extension simplifies testing, and its main advantage is that it eliminates the need for boilerplate code. Its various plugins add support for decorators, fixtures, parameterised testing and much more.
To learn how to use Python, its frameworks and its Data Science and Machine Learning libraries, DataScientest is cvhe place to be. Our various training courses include a module dedicated to this programming language.
Through these courses, you can acquire all the skills required to work as a Data Analyst, Data Scientist, Data Engineer, Machine Learning Engineer or Data Product Manager.
All our programmes can be completed as a BootCamp or continuing education, and our organisation is eligible for funding programs. Discover DataScientest!
You know all about Nose. For more information on the same subject, see our complete dossier on Python and our dossier on SciPy.


