Docker is a tool for creating and isolating environments called containers. The aim is to isolate an application on a particular environment so that it can be run on any OS (Windows, Linux, Mac, etc.) without any adaptability problems.
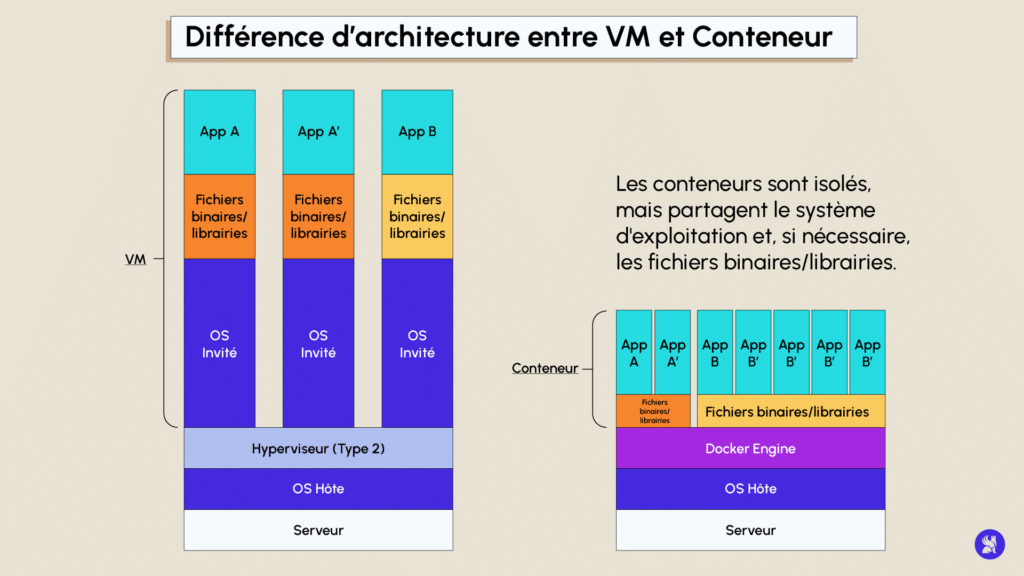
What’s the difference with a virtual machine? A VM will contain an operating system in its entirety, i.e. drivers, binary files and libraries, whereas Docker containers have only the bare essentials needed to run the application. Docker uses the host machine’s OS to make system calls and run applications, making it extremely lightweight.
Docker is configurable for Linux, as its core technology is based on a feature called LXC (Linux Kernel). Historically, Docker was distributed in open source format in 2013 and was only integrated into Windows in 2016.
In this article, we’ll start by explaining how to install Docker on Windows and Linux. Next, we’ll introduce you to Docker images and the Dockerfile. Finally, we’ll give you a non-exhaustive list of Docker commands.
Installation
Linux
There are 3 ways to install Docker on Linux:
- Installation via the official package
- Installation via Docker Engine
- Installation via the repo
1. Package installation
To install Docker the easy way, just install the docker.io package
It would be very useful to also install docker-compose
2. Installation via Docker Engine
Simply run the following command:
Check that everything has been installed correctly by launching the “hello-world” image.
3. Installation via le Repo
Update APT
Add the GPG key from the Docker website and point to the repository of the “stable” version of Docker CE :
Windows
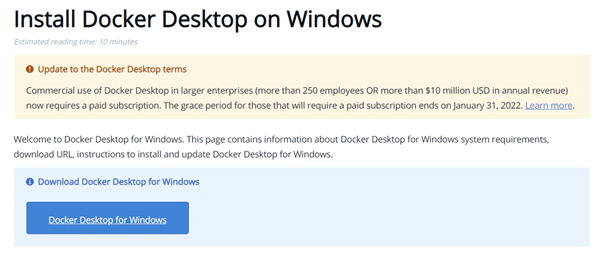
To install Docker under Windows, you need to use the Docker Desktop application.
To do this, go to the following site:
https://docs.docker.com/desktop/windows/install/
And click on the following blue box:
Then go to your file explorer, downloads, and double-click on the freshly downloaded link.
The following window will open:
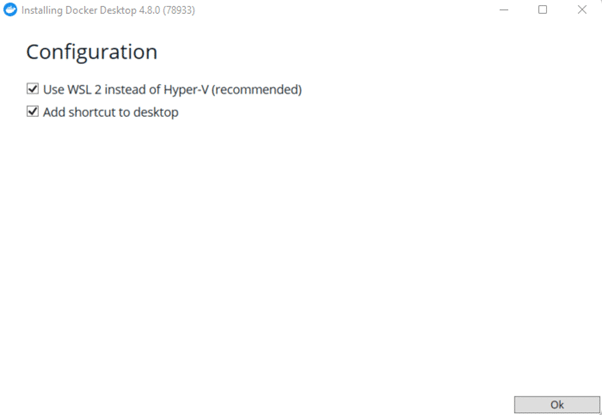
Click on “Ok” and make sure the 2 boxes are ticked, then the installation will start.
Please note: at the end of the installation, Windows will have to restart, so be sure to save your work.
Accept the terms and the docker window appears.
The following window is likely to appear:
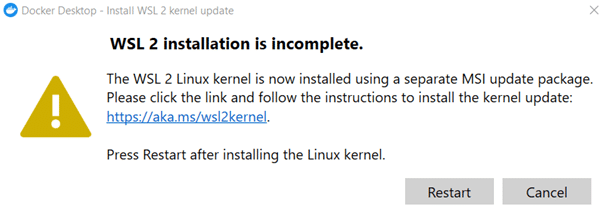
Do not close this window!
Click on the given link, go to step 4 and download the WSL2 linux kernel update package for x64 machines.
You can return to the previous window and click on restart.
The Docker application launches, and if this is your first time using it, you can follow the tutorial to discover Docker Desktop.
Once the software has been installed on your computer, we’re going to start manipulating Docker by importing an image and creating our first Docker container.
Our tutorial was carried out in a Linux environment, because under Windows, everything is done through the Docker Desktop interface.
Docker Image
First, we need a Docker image for our container. An image is essential if our container is to come to life. If we were to draw a parallel, the container represents a computer from a hardware point of view, and the image represents all the digital resources present on it: OS, binary files, software. Just as a computer is useless if nothing is installed on it, software is useless if it isn’t installed somewhere.
We’re back to the architecture of a container and a content.
Let’s import a Linux image from the Docker Hub. Open a terminal and run the following command:
Well done! You’ve downloaded an Ubuntu image from the docker hub, which you’ll use for your future container.
In our command, we see a “:latest” following the image name. This is called a tag and represents the last updated Ubuntu image on the Docker Hub.
Run the following command to display the images available on your machine:
Now let’s launch a container with the Ubuntu image we’ve just downloaded.
Nothing happens, and this is perfectly normal. A container has a limited lifespan, because when you launch a container, a command is executed and when it’s finished, the container stops, but remains available if you want to restart it later.
To be able to interact and navigate within the container, you need to run the following command:
Having imported and launched a container “by hand”, let’s now look at how, from a file, we can create a custom container.
Dockerfile
A dockerfile is a file that allows us to build a custom docker image. It also contains a set of commands to run in the container, applications to install, environment variables to initialize…
In a basic python file, let’s just write a simple function :
Next, let’s create our Dockerfile, which will allow us to launch our container:
Let’s explain what our Dockerfile contains:
- The FROM keyword allows us to retrieve an image from the Docker Hub.
- RUN allows us to add an intermediate layer to the construction of our image. We want our image to have a Debian base (Linux distribution) and Python installed.
- ADD allows us to add a local file to our container. Be careful to specify the path.
- Finally, in a terminal and in the folder containing the Dockerfile, run the following command:
To find out more...
Docker has many features that we haven’t covered in this article, such as networks, volumes and docker-compose, which lets us launch a set of containers at the same time.
This technology has become a must-have for the Data Engineer or ML Engineer in the enterprise, and full training is available in our Data Engineer curriculum or in our expert Advanced Engineering curriculum, so don’t hesitate to make an appointment with one of our consultants for more details.


